Outline:
- Introduction
- Prepping Your Jacket for DIY Customization
- Showcase: Amazing DIY Leather Jacket Transformations
- Mistakes to Avoid When Dyeing a Leather Jacket
- Decorating Your Jacket: Techniques and Tips
- Sewing on Patches:
- Painting:
- Studding:
- Embroidery:
- Dyeing:
- Adding Fringe:
- Caring for Your Customized Leather Jacket
- Common Mistakes to Avoid While Sewing a Leather Jacket
- Conclusion
- Introduction:
A leather jacket is more than just a piece of clothing – it’s a statement, an emblem of coolness and effortless style that transcends fleeting fashion trends. When it comes to personalizing this timeless piece, the possibilities are boundless, creating the opportunity for anyone to craft their own unique look. This guide delves into how you can imprint your individuality on a leather jacket, transforming it from a mere wardrobe staple into a distinct expression of your personal style. Whether you’re altering the jacket’s color through dyeing, adding a custom sewn patch, or even redesigning it completely, the journey is all about breaking the mold and creating something that truly represents you.
Prepping Your Jacket for DIY Customization:
Before embarking on the journey to customize your leather jacket, proper preparation is crucial. It lays the foundation for a successful DIY project and helps to ensure that your personal style shines through in the final product.
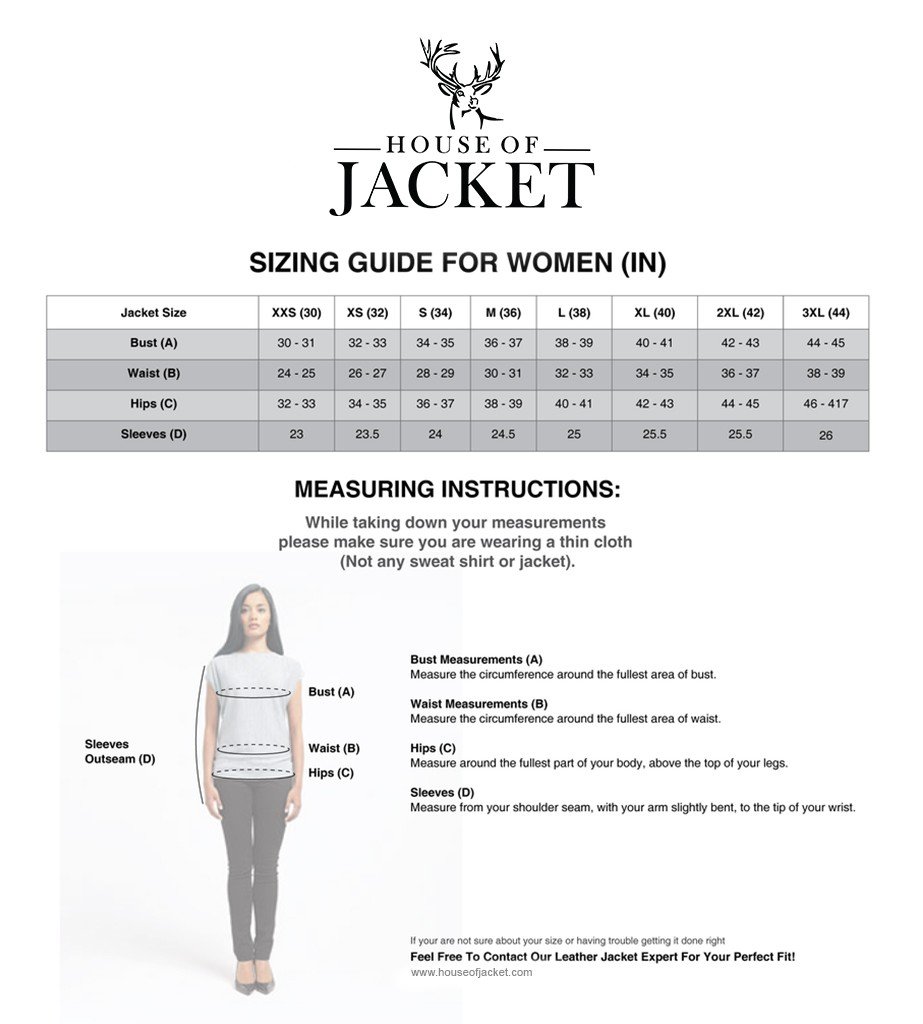
Begin by selecting a high-quality leather jacket. The jacket should fit you well and be in a style you love. Remember, a good fit will not only enhance your comfort but also significantly influence the jacket’s overall aesthetics after customization.
Once you’ve chosen your jacket, it’s time for a thorough cleaning. Leather jackets can accumulate dirt, dust, and oils that may interfere with the dyeing or sewing process. Use a specialized leather cleaning product to gently clean the jacket without causing any damage.
Next, if you plan on dyeing the jacket, strip any existing color or finish. This step will help the new dye penetrate the leather more effectively. Apply a professional-grade leather prepare and deglaze, following the instructions provided by the manufacturer.
After cleaning and prepping, your jacket is ready for customization. Whether you’re adding patches, changing the color, or incorporating other unique elements, your jacket is now a blank canvas ready to reflect your unique style.
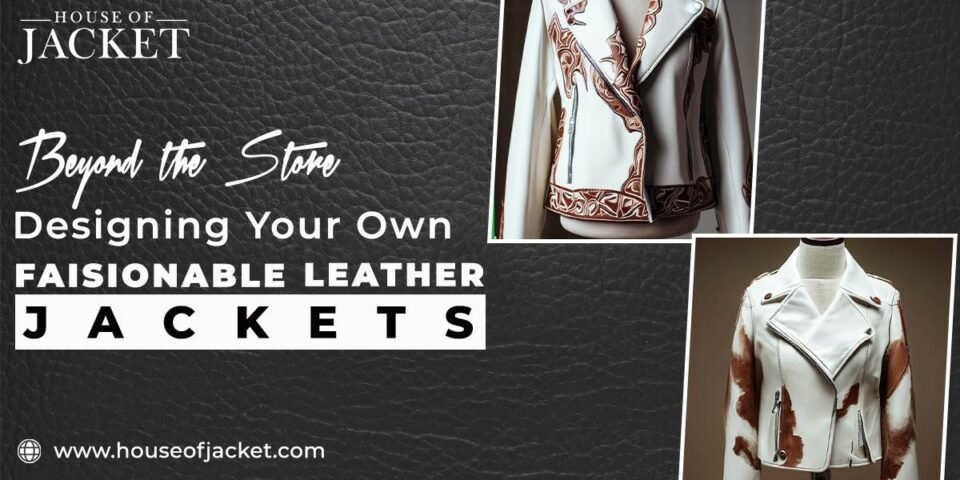
Showcase: Amazing DIY Leather Jacket Transformations:
The realm of DIY leather jacket transformations is indeed a spectacle to behold. From color revamps and artistic painted designs to the addition of eclectic patches and studs, the creativity of personal style knows no bounds. It’s thrilling to see how a once-standard leather jacket evolves into a one-of-a-kind fashion statement, reflecting the unique personality and style of its owner. Each transformation is a testament to the power of DIY customization, a visual narrative of personal expression, and proof that with a bit of creativity and effort, anyone can craft a truly individual piece from an everyday leather jacket. This showcase will highlight some remarkable transformations that not only inspire but also underline the limitless potential of personal style.
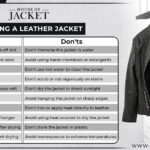
Mistakes to Avoid When Dyeing a Leather Jacket:
Here are the common mistakes to avoid when dyeing a leather jacket:
- Neglecting thorough cleaning: Not cleaning the jacket properly before dyeing can result in an uneven dye application. Always use a specialized leather cleaner to remove any grime and oils.
- Not stripping existing color or finish: Failing to remove the jacket’s original color or finish can inhibit the new dye from properly penetrating the leather, leading to inconsistent color. Always use a quality leather preparer and deglaze for this process.
- Rushing the drying process: Hastening the dye to dry can cause color variations. Always allow sufficient drying time between dye coats and before applying a sealant to ensure a uniform color finish.
Avoiding these mistakes can help achieve a successful, smooth, and evenly dyed leather jacket.
Decorate Your Jacket: Techniques and Tips:
Customizing a leather jacket is a fantastic way to exhibit your personal style and creativity. Here are some ideas and suggestions to get you started:
- Sewing on Patches: Patches are a popular way to decorate jackets, expressing personal interests or affiliations. When sewing patches onto leather, remember to use a leather-specific needle and sturdy thread. Always plan your layout before sewing to avoid unnecessary holes in the leather.
- Painting: Leather paints offer a way to create intricate designs on your jacket. However, remember to use acrylic leather paint and apply it in thin, multiple layers for a smooth finish.
- Studding: Metal studs can give your jacket a punk or rocker edge. Use a stud setter to ensure secure and even placement.
- Embroidery: If you’re up for a challenge, try embroidering your jacket. Use a punch needle, and again, always plan your design beforehand to prevent unwanted punctures.
- Dyeing: Changing the color of your jacket can dramatically transform its look. Be sure to clean the jacket thoroughly, strip any previous dye, and allow sufficient drying time between coats.
- Adding Fringe: Fringe can provide a western or boho touch. Make sure it’s secured firmly, whether it’s sewn or glued.
Remember, the key to a successful DIY project is patience and planning. Take your time to execute each step correctly, and soon you’ll have a unique leather jacket that truly represents your personal style.
Caring for Your Customized Leather Jacket:
A customized leather jacket is not just a fashion statement but an investment. To ensure your leather jacket looks great for years to come, you need to take care of it properly. Here’s a guide on how to care for your customized leather jacket.
Storage:
- Always hang your leather jacket on a wide padded hanger to maintain its shape.
- Do not store it in plastic or non-breathable covers. Instead, opt for a cloth garment bag. This stops the leather from cracking and drying out.
- Keep it in a cool place. Dry place. Avoid direct sunlight, as this can cause the leather to fade or become brittle.
Cleaning:
- For light cleaning, use a damp cloth to wipe off dirt or spills immediately.
- For a more thorough cleaning, it’s best to consult a professional leather cleaner. They can help remove tougher stains without damaging your jacket.
- Never machine wash or dry a leather jacket.
Conditioning:
- Over time, leather can dry out and lose its natural oils. To keep your jacket soft and supple, apply a leather conditioner or cream every few months. This will also help to protect against water damage and stains.
- Always test any product on a small, inconspicuous area before applying it to the entire jacket.
Avoid Water:
- Leather doesn’t like water. If your jacket gets wet, allow it to dry naturally. Do not use a heater or hair dryer, as this can cause the leather to shrink or warp.
- Once dried, apply some conditioner to restore its suppleness.
Protection:
- If you live in an area with a lot of rain or snow, consider using a leather protector spray. This will create a barrier against water and other potential stains.
- Be cautious with perfumes, hairsprays, and makeup as they can stain the leather.
Repairs:
Should your leather jacket get torn or scratched, consult with a leather repair specialist? Attempting to fix it yourself might cause further damage, especially if the jacket is customized.
Custom Detail:
- If your jacket has been painted or has special patches, be extra cautious when cleaning around these areas. The designs can be sensitive to water and certain cleaning solutions.
- For embroidery or other stitched details, ensure they are not snagged or pulled to prevent damage.
Rotate Wear:
If you have more than one jacket, try to rotate them. This will allow your leather jacket some rest, ensuring longevity.
Odor Removal:
- If your jacket starts to smell, air it out. Hanging it outside on a dry day can help remove odors.
- Alternatively, a light spritz of a diluted mixture of white vinegar and water can help neutralize odors. Make sure to patch-test first.
Mind the Lining:
- The inner lining can also accumulate dirt and odors. While you can’t toss your leather jacket into the washer, you can spot-clean the lining using a mild detergent and cold water.
- Caring for a customized leather jacket might seem like a lot of work, but with regular maintenance and proper storage, it can serve as a timeless piece in your wardrobe for many years to come.
Common Mistakes to Avoid While Sewing a Leather Jacket:
Sewing a leather jacket can be a rewarding project, but it requires special attention and care due to the unique properties of leather. Here’s a list of do’s and don’ts to help you navigate the process:
| Do’s: | Don’ts: |
| Prep the Leather Properly: Clean the leather using leather conditioners to ensure it’s soft and pliable. This helps reduce the chances of the leather cracking or getting damaged while sewing. | Don’t Skip the Interface: Using a proper interfacing gives structure to the leather jacket. Choose an interfacing that’s appropriate for the weight of the leather you’re using. |
| Use Specialized Needles and Thread: Opt for leather or jeans needles, and use strong, durable thread that won’t easily break. | Avoid Backstitching at the Start and End: Backstitching can weaken the leather. Instead, leave long thread tails and tie them off by hand. |
| Test Stitch: Always test a stitch on a scrap piece of the same leather to make sure the tension is right and the stitch length is appropriate. | Don’t Iron Directly on Leather: If you need to smooth out wrinkles, use a piece of paper or cloth between the iron and the leather, and use low heat. |
| Use Longer Stitch Length: Leather requires a longer stitch length (usually around 3mm or more) compared to other fabrics. | Avoid Using Sharp Tools Carelessly: This includes scissors, rotary cutters, or seam rippers. Any cut or mark on leather is usually permanent. |
| Tape Instead of Pinning: Use masking tape or clips to hold pieces together instead of pins. Leather can become permanently damaged by pin holes. | Don’t Pull or Stretch the Leather: While sewing, avoid pulling or stretching the leather as it can distort its shape. |
| Use a Walking Foot or Teflon Foot: These feet types help the leather to move smoothly under the sewing machine. | Don’t Overlap Seams Too Much: Leather is thick, so overlapping too many layers can make it difficult to sew through and can create bulky areas in the finished jacket. |
| Be Patient and Slow: Take your time, especially around curves or intricate areas. Leather doesn’t forgive mistakes easily. | Avoid Wetting the Leather Excessively: While slight dampness can make leather easier to shape, excessive moisture can damage the leather or cause it to stretch or shrink. |
| Punch Holes for Buttons: If you’re adding buttons, use a whole punch specifically for leather to create clean openings. | Don’t Use Regular Sewing Pins: As mentioned earlier, pins can leave permanent holes. Stick to tape or clips. |
- Conclusion:
In the vast landscape of fashion, the leather jacket remains an iconic piece that seamlessly merges timelessness with adaptability. Crafting a unique style with this staple isn’t just about donning a garment; it’s about embracing an attitude, a persona. Your leather jacket can be both a canvas for your self-expression and a testament to your individuality. By incorporating personal touches, experimenting with accompaniments, and wearing it with confidence, you don’t just wear a leather jacket – you make a statement. As you journey through the fashion world, let your leather jacket be a reflection of the authentic, unapologetic, and unique you. Embrace its versatility, cherish its history, and most importantly, make it your own.